Your high Hydro-Québec bill isn’t just from an old water heater; it’s from an inefficient thermal circuit losing heat at multiple, specific points in your basement.
- Uninsulated tanks and pipes act like radiators, constantly bleeding heat into the cold basement air, forcing the unit to cycle more often.
- Poor building envelope integrity, especially in older Montreal homes with unsealed rim joists, creates cold zones that accelerate this heat loss.
Recommendation: Conduct a systematic audit of your entire water heating system—from the tank’s UEF rating to the R-value of your pipe insulation—to identify and fix the costliest leaks in your home’s energy budget.
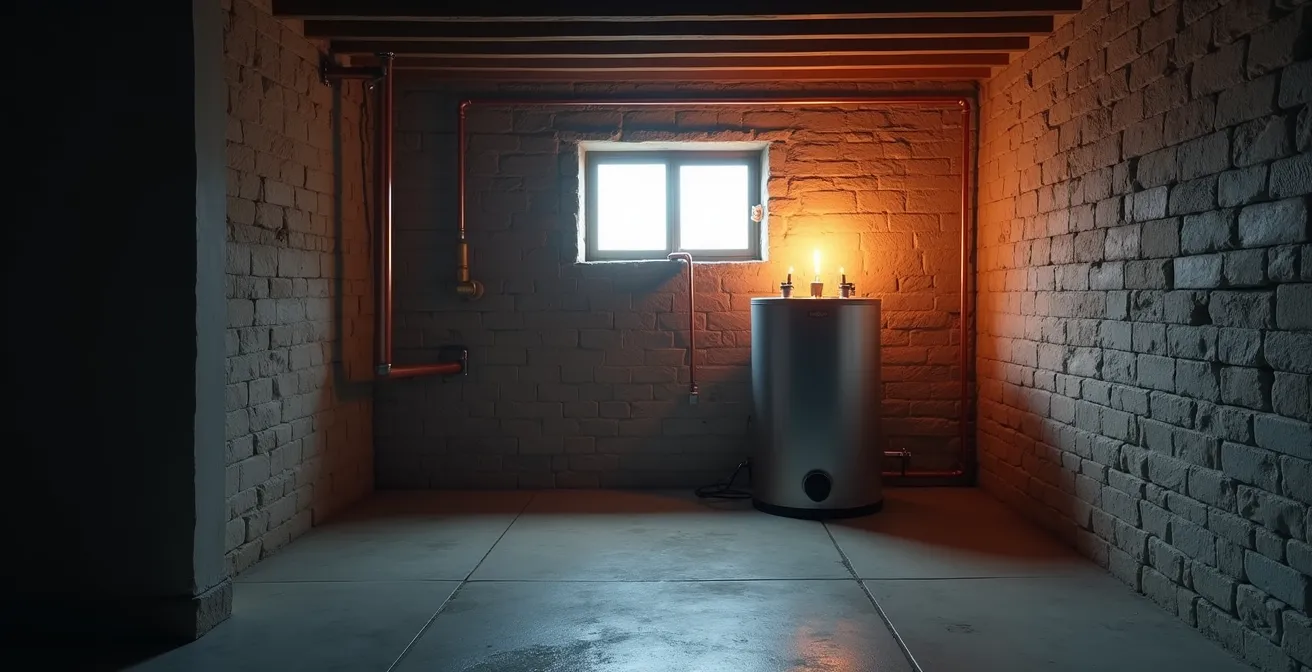
If you’ve walked into your unfinished Montreal basement and been met with a surprising wave of warmth, your first thought might be relief from the outside chill. But when your Hydro-Québec bill arrives, that warmth feels less like a comfort and more like a costly problem. You’re not just heating your water; you’re heating your foundation. This phenomenon is a classic symptom of significant energy waste, stemming from a water heating system that is losing a constant battle against the laws of thermodynamics.
Many homeowners immediately suspect their old water heater is the sole culprit, and while partially true, that’s rarely the full story. The common advice is to simply wrap the tank in an insulation blanket or replace the unit. However, this approach ignores the interconnected nature of heat loss. The tank, the pipes, and the basement’s building envelope all form a single thermal circuit. A weakness in one part compromises the entire system, especially during our harsh Quebec winters.
The real key to lowering your bill is to stop thinking about just the water heater and start thinking like an energy auditor. The true issue lies in multiple, often hidden, points of thermal failure. This article will guide you through a systematic diagnosis of your home’s hot water system. We will move beyond generic advice to provide a cost-aware analysis of each component, from the inherent efficiency of the tank itself to the crucial, and often overlooked, insulation of your basement’s structure. By understanding where and why you’re losing heat, you can make targeted, cost-effective improvements that deliver real savings.
This guide breaks down the most common and costly sources of heat loss from your water heater system. Follow along to perform your own home energy audit and discover where your money is going.
Summary: Diagnosing and Fixing Water Heater Heat Loss
- Why Do Old Tanks Cool Down Faster Than New Models?
- How to Estimate the Annual Cost of Uninsulated Hot Water Pipes?
- Fiberglass Wrap vs. Foil Bubble Wrap: Which Retains Heat Longer?
- The Error of Sealing Combustion Air Vents While Insulating the Room
- When to Perform a Thermal Camera Scan of Your Plumbing Wall?
- How to Spot Temperature Anomalies That Indicate Wet Insulation?
- Rubber vs. Polyethylene Foam: Which Insulates Hot Water Better?
- How to Insulate Your Basement Header to Protect Pipes and Save Heat?
Why Do Old Tanks Cool Down Faster Than New Models?
The primary reason your older water heater struggles to retain heat is a simple matter of outdated insulation and efficiency standards. Over the years, federal regulations have become significantly stricter. An electric storage tank heater manufactured a decade ago might have as little as one inch of foam insulation. In contrast, modern units are built with two inches or more of high-density foam, dramatically reducing standby heat loss—the heat that escapes through the tank walls while it’s idle. This standby loss is precisely what’s warming your basement at your expense.
The efficiency of a water heater is now measured by its Uniform Energy Factor (UEF). This rating considers standby loss, cycling losses, and recovery efficiency to give a comprehensive picture of its annual operating cost. As a benchmark, Natural Resources Canada’s 2024 regulations mandate a minimum of 0.9349 UEF for new high-draw electric water heaters, a standard many older models simply cannot meet. If your tank is over 10 years old, it was built to a much lower standard.
Essentially, an old tank is in a constant, losing fight against heat transfer. The minimal insulation provides a path of least resistance for thermal energy to escape into the cooler ambient air of your basement. This forces the heating elements to cycle on more frequently just to maintain the set temperature, directly contributing to a higher electricity bill. Upgrading to a new, ENERGY STAR® certified unit is often the most impactful long-term solution, but insulating the existing tank can be a cost-effective interim measure.
How to Estimate the Annual Cost of Uninsulated Hot Water Pipes?
While the tank itself is a major source of heat loss, the exposed hot water pipes running through your cold basement are a close second. Every meter of uninsulated copper or PEX pipe acts as a radiator, continuously shedding heat into the surrounding air. This not only wastes energy but also means you have to run the tap longer, waiting for truly hot water to arrive, which wastes both water and energy. The cumulative financial impact can be substantial.
To put this in perspective, consider the heat loss from a typical pipe run. The amount of energy lost depends on the pipe material, its diameter, the water temperature, and the ambient basement temperature. For a Montreal homeowner, this translates into a tangible annual cost that can be estimated.

As the image illustrates, these pipes are a constant source of heat radiation. A simple calculation can reveal the cost. The table below, based on standard engineering formulas and current Hydro-Québec rates, shows the estimated annual cost of heat loss for a 10-meter (approx. 33 feet) run of uninsulated pipe compared to an insulated one.
| Pipe Material | Diameter | Heat Loss per Meter | Annual Cost (Hydro-Québec Rates) |
|---|---|---|---|
| Copper | 3/4 inch | 35W/m | $92 |
| PEX | 3/4 inch | 28W/m | $74 |
| Copper (insulated) | 3/4 inch | 8W/m | $21 |
Beyond the direct cost savings, insulating your pipes has another benefit. The U.S. Department of Energy reports that insulated pipes deliver 2°F–4°F hotter water to the faucet, allowing you to potentially lower the temperature setting on your water heater tank, compounding your savings. For a small investment in pipe foam, you can save over $70 per year on a single 10-meter run.
Fiberglass Wrap vs. Foil Bubble Wrap: Which Retains Heat Longer?
Once you’ve decided to insulate your water heater tank, you’ll face a choice of materials at your local RONA or Réno-Dépôt. The most common options are fiberglass blankets and reflective foil bubble wrap. While both improve efficiency, they work on different principles and have distinct advantages. Choosing the right one depends on your budget, your tank’s location, and your primary goal.
A fiberglass blanket works by trapping air, slowing down conductive and convective heat transfer. Its effectiveness is measured by its R-value; a higher R-value means better thermal resistance. A standard water heater blanket provides about R-11. Its main drawback is its susceptibility to moisture, which can compress the fibers and drastically reduce its insulating properties—a key concern in damp basements. On the other hand, foil bubble wrap functions primarily as a radiant barrier. It reflects thermal radiation back towards the tank. While its R-value is typically lower (around R-4), it is waterproof and unaffected by humidity, making it a durable choice for potentially damp environments.
From a cost-benefit perspective, an insulation blanket can reduce standby heat losses by 25%-45%, a significant saving that often pays for the material in about a year. Rigid foam board is another option, offering high R-value and moisture resistance, but at a higher cost and with a more complex installation.
| Material | R-Value | Moisture Resistance | Cost at RONA/Réno-Dépôt | Payback Period |
|---|---|---|---|---|
| Fiberglass Blanket | R-11 | Low (absorbs moisture) | $20-30 | 12 months |
| Foil Bubble Wrap | R-4 (radiant barrier) | High (waterproof) | $35-45 | 18 months |
| Rigid Foam Board | R-10 | High | $40-50 | 24 months |
For most electric water heaters in a dry Montreal basement, a fiberglass blanket offers the best return on investment. However, if your basement is prone to dampness or if you have a gas heater requiring specific clearances, the moisture-resistant properties of foil or rigid foam may be a wiser long-term choice.
The Error of Sealing Combustion Air Vents While Insulating the Room
While insulating your basement and water heater is a smart energy-saving move, it carries a critical risk if you have a natural gas or propane water heater. These “atmospherically vented” appliances require a constant supply of fresh air for proper combustion. Sealing the room too tightly or improperly installing insulation can block this airflow, leading to a dangerous condition called backdrafting, where combustion gases like carbon monoxide are pulled back into your home instead of venting outside.
Homeowners often make the mistake of trying to make the utility area as airtight as possible to maximize heat retention. This includes sealing combustion air vents or packing insulation too closely around the unit. This is extremely dangerous. The appliance needs to “breathe.” As a safety rule, gas water heaters require a significant volume of air, and blocking the intake vents near the floor or the draft hood on top can starve the burner. This incomplete combustion is inefficient and produces lethal carbon monoxide.
Manufacturers provide strict guidelines to prevent this. For example, a technical bulletin from a leading brand emphasizes safety clearances. As the A.O. Smith Technical Bulletin states in their official “Water Heater Insulation Safety Guidelines”:
Do not allow insulation to come within 2 inches of the floor to prevent blockage of combustion air flow to the burner
– A.O. Smith Technical Bulletin, Water Heater Insulation Safety Guidelines
To ensure a safe installation, it is imperative to follow a precise checklist. Never compromise on these clearances for the sake of a few extra degrees of warmth. The risk is simply not worth the marginal energy savings.
Your Action Plan: Safe Insulation Checklist for Gas Water Heaters
- Never cover the top of a gas water heater; keep the vent draft hood completely unobstructed.
- Maintain a 2-inch minimum clearance from the floor for the combustion air intake.
- Keep insulation at least 6 inches away from the flue pipe to prevent a fire hazard.
- Do not cover thermostat controls or the temperature and pressure (T&P) relief valve.
- Leave all access panels and warning labels exposed for maintenance and safety inspections.
When to Perform a Thermal Camera Scan of Your Plumbing Wall?
Sometimes, the most significant heat loss isn’t from the tank or visible pipes, but from plumbing hidden within walls. A hot water pipe running against an uninsulated exterior wall creates a “thermal bridge,” a direct pathway for heat to escape your home. This is not only inefficient but can also lead to condensation and moisture problems inside the wall cavity. While you might notice a section of the wall feeling cool or even damp, a visual inspection is often not enough to pinpoint the exact location and severity of the problem.
This is where a thermal camera scan becomes an invaluable diagnostic tool. A thermal imaging camera, or even a handheld non-contact infrared thermometer, allows you to “see” temperature differences across a surface. By scanning the wall where you suspect pipes are located, you can identify the distinct thermal signature of a hot water line and, more importantly, the cold spots that indicate a lack of insulation or an air leak.
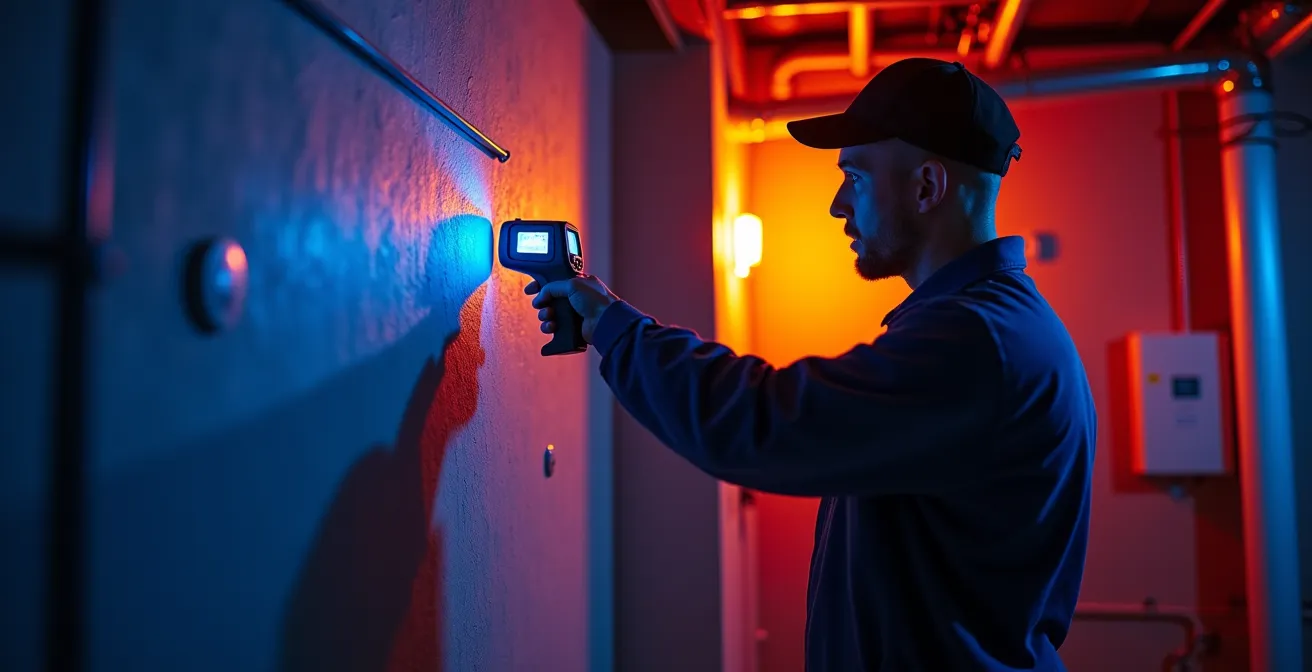
You should consider a thermal scan under these circumstances:
- High Bills with No Obvious Cause: If you’ve insulated your tank and exposed pipes but your bills remain high, the problem might be hidden.
- Consistently Cold Rooms: A room that is chronically colder than the rest of the house may have poorly insulated pipes in its walls, pulling heat out of the living space.
- Visible Moisture or Mold: Any sign of dampness or mold on a wall that contains plumbing is a major red flag that warrants an immediate thermal investigation to find the source of condensation.
- Pre-Renovation Planning: Before undertaking a major renovation, a thermal scan can reveal hidden energy inefficiencies that are best addressed while the walls are open.
Performing a scan on a cold day will produce the most dramatic and clear results, making it easier to identify problem areas. This small diagnostic step can save you from much larger repair costs down the line and uncover significant sources of hidden energy waste.
How to Spot Temperature Anomalies That Indicate Wet Insulation?
Insulation’s effectiveness is almost entirely dependent on its ability to trap dry, still air. When insulation becomes wet, its R-value plummets. Water is an excellent conductor of heat, so damp insulation offers little resistance to thermal transfer. A small, undetected leak from a pipe fitting or condensation buildup can turn your expensive insulation into a thermal highway, actively pulling heat away from your pipes and tank and potentially causing structural damage and mold.
Spotting wet insulation can be tricky because the moisture is often hidden behind vapor barriers or drywall. However, temperature anomalies are a tell-tale sign. A patch of wall or floor that is inexplicably colder than the surrounding area is a major red flag. This cold spot is caused by the evaporative cooling effect and the high thermal conductivity of the wet material inside. Proper maintenance, including regular checks for leaks and ensuring insulation remains dry, is crucial for efficiency. In fact, studies show that proper insulation and maintenance can save 7%-16% on your annual water heating costs.
You can use a simple, two-step method to investigate suspected moisture without tearing open a wall:
- Scan with an Infrared Thermometer: Use a non-contact infrared thermometer to scan the surface of walls and floors near plumbing fixtures. Look for localized cold spots, especially variations of 5°F (3°C) or more compared to the adjacent area. This identifies a potential problem zone.
- Confirm with a Moisture Meter: Once you’ve found a cold spot, use a pinless moisture meter to confirm the presence of water. This device sends an electromagnetic signal into the material to detect moisture content. A reading above 20% moisture content is a strong indicator of wet insulation that requires immediate attention.
Ignoring these signs can lead to escalating energy bills and costly repairs. By proactively hunting for these temperature anomalies, you can catch moisture problems early and protect both your home and your budget.
Rubber vs. Polyethylene Foam: Which Insulates Hot Water Better?
When it comes to insulating hot water pipes, the two most common DIY materials are black EPDM rubber foam and grey polyethylene foam sleeves. While they may look similar, their technical properties differ significantly, making one a clearly superior choice for the demanding conditions of a hot water system, especially in a cold Montreal basement.
Polyethylene foam is inexpensive and widely available. However, its primary weakness is its limited temperature range, typically maxing out around 80°C (176°F). Since many water heaters are set to 60°C (140°F) or higher, this leaves very little safety margin. Over time, the high heat can cause polyethylene to become brittle and crack. More importantly, it loses its flexibility in the cold, a major issue when working in an unheated basement during winter. It also has a higher water vapor permeability, meaning it’s more likely to absorb moisture if condensation occurs.
EPDM rubber foam, by contrast, is engineered for more extreme conditions. It can handle temperatures up to 105°C (221°F) and remains flexible at temperatures as low as -40°C. Its closed-cell structure gives it very low water vapor permeability, making it highly resistant to moisture absorption. It also typically carries a better fire safety rating. While it costs more per foot, its superior durability and performance make it the better long-term investment for hot water lines.
| Property | EPDM Rubber Foam | Polyethylene Foam |
|---|---|---|
| Temperature Range | -40°C to +105°C | -30°C to +80°C |
| Water Vapor Permeability | 0.05 perm-inch | 0.15 perm-inch |
| Flexibility at -20°C | Remains flexible | Becomes brittle |
| Fire Rating (ASTM E84) | Class 1 | Class 2 |
| Cost per linear foot | $2.50-$4.00 | $1.00-$2.00 |
For an energy auditor, the choice is clear: EPDM rubber is the professional-grade material for hot water pipes. Its resilience against both high heat and extreme cold ensures a longer lifespan and more reliable performance, protecting your investment and maximizing your energy savings over time.
Key Takeaways
- Older water heaters lack sufficient insulation, leading to constant standby heat loss that warms your basement and inflates your energy bill.
- Uninsulated pipes act as radiators, costing an estimated $70-$90 annually per 10 meters of exposed pipe at Hydro-Québec rates.
- Insulating a gas water heater is effective but requires strict safety clearances around air intakes and flue pipes to prevent deadly carbon monoxide backdrafting.
How to Insulate Your Basement Header to Protect Pipes and Save Heat?
Finally, an effective energy audit must look beyond the plumbing itself and examine the building envelope. In many older Montreal homes with fieldstone or concrete block foundations, one of the most significant sources of heat loss is the rim joist (or basement header). This is the wooden structure that sits on top of the foundation wall, where the floor joists of the main level rest. This area is often completely uninsulated, creating a massive thermal bridge that allows frigid winter air to infiltrate the basement.
This cold air infiltration does two things: it dramatically lowers the ambient temperature of your basement, forcing your water heater to work harder to overcome standby loss, and it can put your water pipes at risk of freezing if they run near the foundation wall. Properly air-sealing and insulating the rim joist is one of the most cost-effective upgrades you can make to improve your home’s overall energy efficiency.
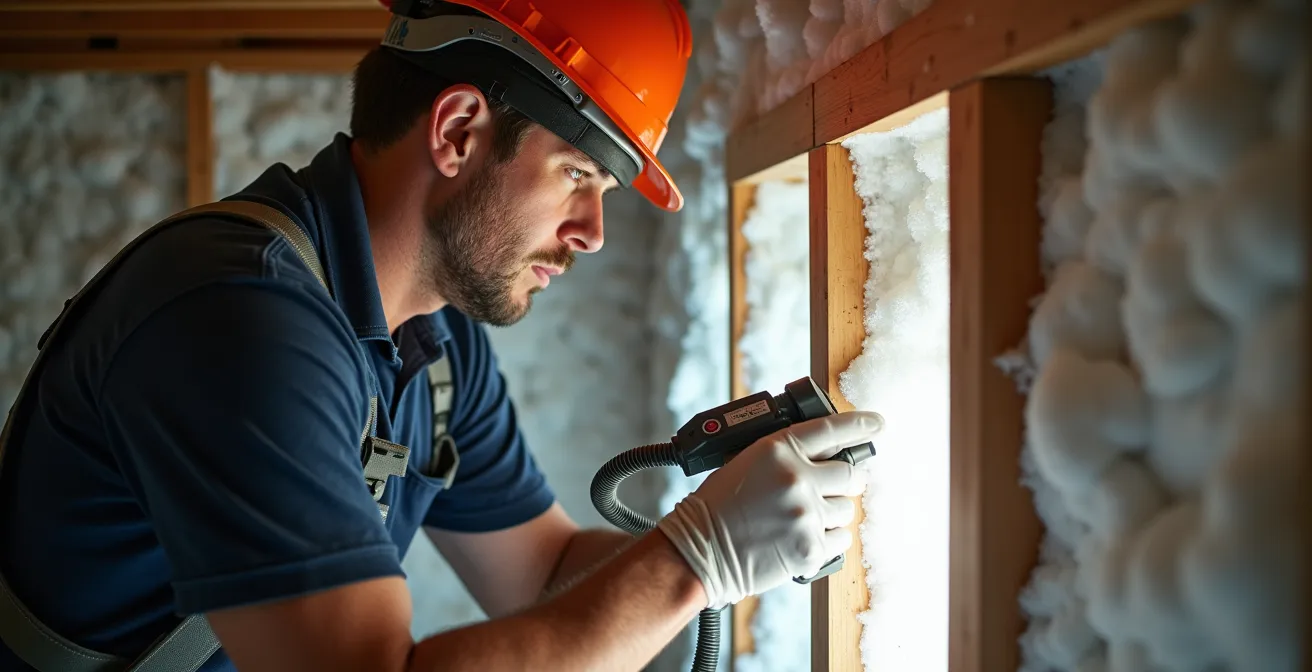
The best practice for our climate involves a combination of air sealing and rigid insulation. This creates an airtight and thermally resistant barrier right at the edge of your home’s conditioned space. Following a specific method ensures a durable and effective result.
- Clean and Prep: Thoroughly clean the rim joist area. In older Montreal boroughs, this means removing decades of cobwebs and debris from the top of the fieldstone or concrete foundation.
- Air Seal with Spray Foam: Use spray foam to meticulously seal the critical gap between the wooden sill plate and the top of the foundation. This single step is crucial for stopping cold air infiltration.
- Install Rigid Foam: Cut pieces of rigid foam insulation (a minimum of R-20 is recommended for this application) to fit snugly between the floor joists, pressed firmly against the rim joist.
- Seal the Edges: Seal all four edges of each rigid foam piece with more spray foam or a high-quality acoustical sealant. This ensures a complete, airtight barrier.
- Check Vapour Barrier Requirements: Depending on your foundation type and local building codes, you may need to install a vapour barrier. Always consult the Quebec Construction Code or a professional to ensure compliance.
By treating the rim joist, you complete the thermal circuit. You’re not just patching a symptom (the warm basement); you’re solving a root cause by preventing the cold from getting in. This holistic approach is the hallmark of a successful home energy audit.
Now that you can identify each point of failure in your home’s hot water thermal circuit, your next step is to perform a systematic self-audit. Start at the tank, move to the pipes, and finish with the basement envelope to create a prioritized action plan that will deliver the most significant savings on your Hydro bill.