In summary:
- Moving a toilet in a concrete-slab condo is possible without raising the floor by adopting an “above-floor” plumbing system.
- Success depends on using a macerating (upflush) toilet system concealed within a strategically designed wet wall.
- Proper venting, often using Air Admittance Valves (AAVs) in compliance with the Quebec code, is critical for the system’s function.
- Waterproofing the new wet wall and grouping fixtures efficiently are non-negotiable steps for a durable, high-performance bathroom.
- All work must be inspected before closing walls to ensure compliance with the National Plumbing Code of Canada.
You’ve mapped it all out. The perfect bathroom layout for your Montreal condo, one that finally opens up the space and creates that spa-like flow. But your dream hits a literal wall of concrete. The building’s slab means your toilet’s drain is fixed in place, and the common solutions are deeply unappealing. Breaking into post-tension concrete is a non-starter, and building a raised platform feels like a clumsy compromise that cheapens your high-end design.
Many articles will point you toward a macerating toilet and leave it at that. But simply buying a product isn’t a strategy. The real key to relocating a toilet without aesthetic sacrifice lies in a more holistic approach. It’s not about a single fixture, but about designing a complete, integrated “above-floor plumbing system”. This method is about outsmarting the concrete, not fighting it. It involves concealing the mechanics within a standard-depth wall, ensuring flawless hydraulic efficiency through smart venting, and strategically grouping your fixtures.
This guide moves beyond the basics to give you the contractor’s playbook. We’ll deconstruct this system piece by piece, from the critical role of venting and the specifics of waterproofing a wet wall to the final inspection that makes your creative solution official. This is how you achieve a relocated toilet that is both functionally perfect and completely invisible, preserving the sleek, level floor your design deserves.
This article explores the essential technical considerations and design strategies for successfully executing such a project in a Montreal condo. Follow along as we detail the critical components that make this sophisticated renovation possible.
Summary: A Contractor’s Guide to Above-Floor Toilet Relocation
- Why Poor Venting Leads to Slow Drains in New Bathrooms?
- How to Measure Rough-In Dimensions for a Freestanding Tub?
- Thermostatic or Pressure Balance: Which Valve for a Luxury Shower?
- The Error of Tiling Directly on Drywall in Wet Zones
- When to Call the Inspector Before Closing the Walls?
- Why Does Flushing the Toilet Scald the Person in the Shower?
- How to Group Wet Zones to Minimize Pipe Length and Heat Loss?
- How to Design a Plumbing System for a Custom Luxury Home?
Why Poor Venting Leads to Slow Drains in New Bathrooms?
Before you even think about the toilet itself, you must understand the invisible force that makes all plumbing work: air. Every time water goes down a drain, an equal volume of air must replace it. Without a proper vent, the draining water creates a vacuum, leading to gurgling sounds, slow drains, and siphoned P-traps that let sewer gas into your bathroom. In an above-floor system powered by a macerating pump, this becomes even more critical. The pump needs air to function efficiently and avoid airlocks.
In a condo renovation, especially in older Montreal buildings, running a new vent pipe to the roof is often impossible. This is where Air Admittance Valves (AAVs) become a key part of your design. An AAV is a one-way valve that opens to let air into the drain system when it detects negative pressure, then closes to block sewer gas. The National Plumbing Code of Canada permits their use under specific conditions, making them ideal for island sinks or, in our case, a relocated bathroom group. However, they are a supplement, not a complete replacement for a traditional vent stack. Proper AAV installation is the difference between a silent, efficient system and a constant headache.
Furthermore, optimizing venting has an unexpected benefit: energy efficiency. Traditional vents that go to the exterior are open pathways for heat to escape your condo. A 2023 report from Passive House Canada highlighted that 15-20% of total building heat loss can occur through plumbing vents. By using AAVs strategically, you not only solve a logistical problem but also improve your condo’s thermal performance.
Action Plan: Essential Venting Requirements for Montreal Condo Renovations
- Verify that your drainage system has at least one primary vent terminating outdoors, as required by the National Plumbing Code; AAVs cannot replace all vents.
- Install approved AAVs (e.g., Studor, Oatey Sure-Vent) only where conventional venting is impractical, as permitted under Section 2.5.9 of the code for renovations.
- Position the AAV a minimum of 100mm above the fixture’s horizontal drain pipe and above the fixture’s flood level rim to comply with Quebec standards.
- Ensure the AAV’s installation location remains accessible for future maintenance and allows for adequate airflow—do not seal it behind a wall.
- Complete all Drain-Waste-Vent (DWV) pressure testing *before* installing the AAVs to prevent damage to the valve’s delicate mechanism.
How to Measure Rough-In Dimensions for a Freestanding Tub?
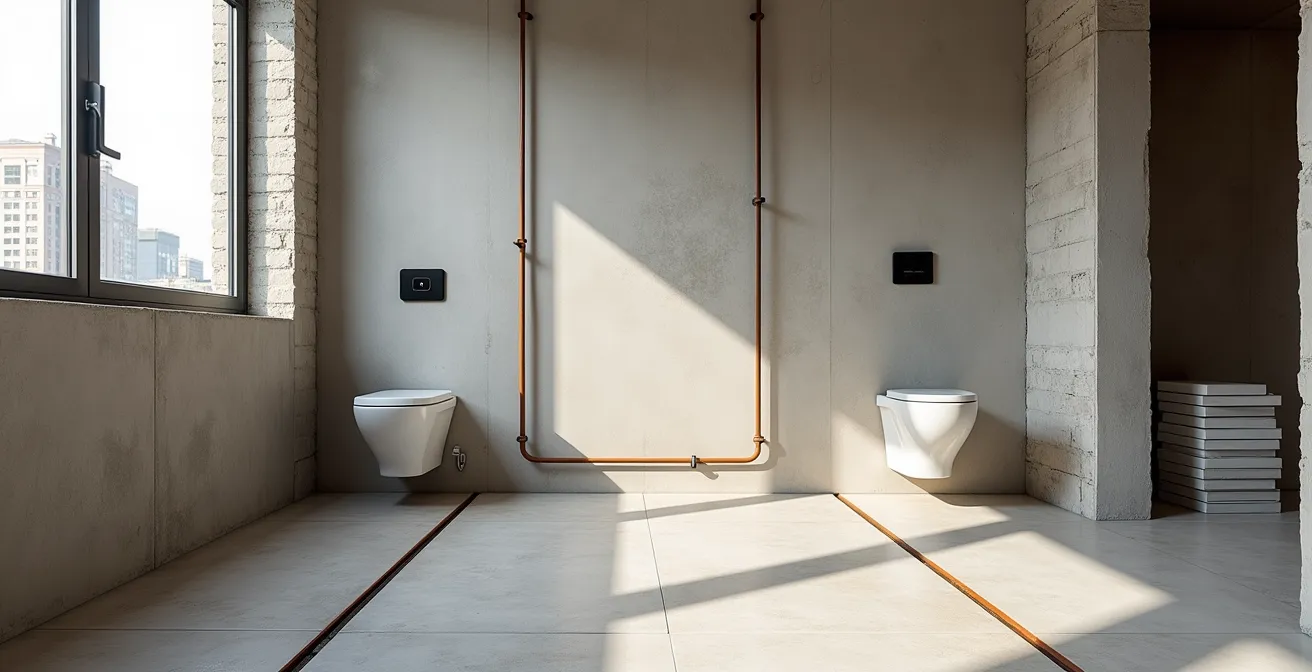
Once you’ve solved the venting puzzle, the next step is layout planning. With a concrete slab, traditional “rough-in” measurements, which assume you can move pipes below the floor, are thrown out the window. Your new mindset must be focused on an “above-floor rough-in”. This means every drain for your new toilet, shower, and sink will sit on top of the concrete and be concealed within walls or a carefully designed base. This is where the beauty of a macerating system truly shines.
For a relocated toilet, you’ll typically use a wall-hung model with an in-wall carrier system (like those from Geberit or Grohe). The macerating pump is often placed directly behind the toilet within this new “wet wall”. When measuring, your critical dimension is no longer a hole in the floor, but the finished wall’s location relative to other fixtures. For other fixtures like a freestanding tub, you will still need a drain connection. The drain pipe will run above the concrete, often hidden behind the tub or inside a low partition wall, before connecting to the macerating pump’s inlet. This requires meticulous planning to ensure the correct slope (typically 1/4 inch per foot) is maintained for gravity to do its job before waste reaches the pump.
This approach transforms a limitation into an opportunity. It allows you to place fixtures almost anywhere you desire, liberating your design from the constraints of the original plumbing stack. The success of this strategy is well-documented in challenging renovation scenarios.
Case Study: Vancouver Condo Pantry-to-Bathroom Conversion
A downtown Vancouver condo owner, Dave Wong, successfully added a full second bathroom by converting a pantry. By using a Sanibest Pro macerating system, the entire installation was done above the floor, eliminating the need to break through the concrete slab. The system proved capable of handling the drainage from a new toilet, sink, and shower, demonstrating how these systems can enable the creation of wet zones in previously impossible locations and add significant value to the property.
Thermostatic or Pressure Balance: Which Valve for a Luxury Shower?
Relocating your toilet often involves a full bathroom overhaul, including the shower. In the context of a high-end Montreal condo renovation, the choice of shower valve is not a minor detail—it’s central to safety, comfort, and function. The two main types are pressure-balance and thermostatic valves. A pressure-balance valve detects changes in water pressure (like when a toilet is flushed) and adjusts the ratio of hot and cold water to prevent scalding. It’s a reliable, cost-effective solution.
However, for a truly luxury experience, a thermostatic valve is the superior choice. It does more than just balance pressure; it maintains an exact water temperature that you pre-select. If someone flushes a toilet, the valve will reduce overall flow to maintain that precise temperature, rather than just adjusting the hot/cold mix. This is especially beneficial in older Montreal buildings where water pressure fluctuations can be extreme. A thermostatic valve offers a higher degree of control, allows for multiple outlets (like a rain head and a hand shower) to run simultaneously at different volumes, and delivers an unparalleled level of comfort and safety.
While a thermostatic valve is more expensive and can require slightly more depth in the wall for installation, the investment aligns perfectly with the goal of creating a high-performance, custom bathroom. It ensures your new, beautifully designed shower feels as good as it looks, without any unpleasant surprises.
This comparison shows how each valve type performs in a typical condo environment. For older buildings with unpredictable plumbing, the investment in a thermostatic valve often pays for itself in comfort and safety.
| Feature | Pressure Balance Valve | Thermostatic Valve |
|---|---|---|
| Anti-scald protection | Good (maintains ratio) | Excellent (maintains exact temperature) |
| Response to pressure fluctuations | Adjusts water flow ratio | Maintains both temperature AND pressure |
| Installation depth required | 3-4 inches | 4-6 inches (challenge for narrow walls) |
| Cost difference | Base price | 2-3x more expensive |
| Best for Montreal old buildings | Adequate | Optimal (handles extreme fluctuations) |
The Error of Tiling Directly on Drywall in Wet Zones
The “above-floor system” hinges on creating a new “wet wall” that cleverly conceals the macerating pump, toilet carrier, and all associated plumbing. This wall is the heart of your renovation, and its construction is not the place to cut corners. A frequent and costly mistake is using standard drywall as a substrate for tile in a shower or behind a toilet. Standard drywall is not water-resistant; once moisture penetrates the tile grout, the gypsum core will turn to mush, leading to tile failure, rot, and catastrophic mould growth.
The correct approach is to build a fortress. The substrate must be a cement board or a specialized foam board (like Schluter-Kerdi-Board). On top of this stable substrate, a topical waterproofing membrane must be applied. Products like Schluter-Kerdi (a sheet membrane) or RedGard (a liquid-applied membrane) create a continuous, impenetrable barrier that ensures no water or vapor can ever reach the wall cavity. This waterproofing must extend well beyond the immediate wet zone, covering the entire wall behind the toilet and shower.
This robust construction is what allows you to confidently place your toilet anywhere. Modern macerating pumps are incredibly powerful; for instance, some 750W models can pump waste up to 30 feet vertically and over 300 feet horizontally. This gives you enormous design freedom, but that freedom is dependent on the integrity of the wet wall you build to house the system. A properly waterproofed wall ensures your innovative plumbing solution will last for decades.
Checklist: Critical Waterproofing Steps for Wall-Mounted Toilet Installation
- Apply a sheet or liquid waterproofing membrane (like Schluter-Kerdi or RedGard) to the entire wet wall area behind the toilet carrier system.
- Extend the waterproofing membrane a minimum of 12 inches beyond the footprint of the toilet carrier on all sides for complete coverage.
- If the macerating pump is concealed within the wall cavity, install a vapor barrier behind the insulation to protect the framing.
- Use only cement board or a foam-based tile backer board as the substrate in the entire wet zone; never use regular or “green” drywall.
- Apply a secondary bead of high-quality sealant at all penetrations where the carrier bolts and water lines pass through the membrane.
When to Call the Inspector Before Closing the Walls?
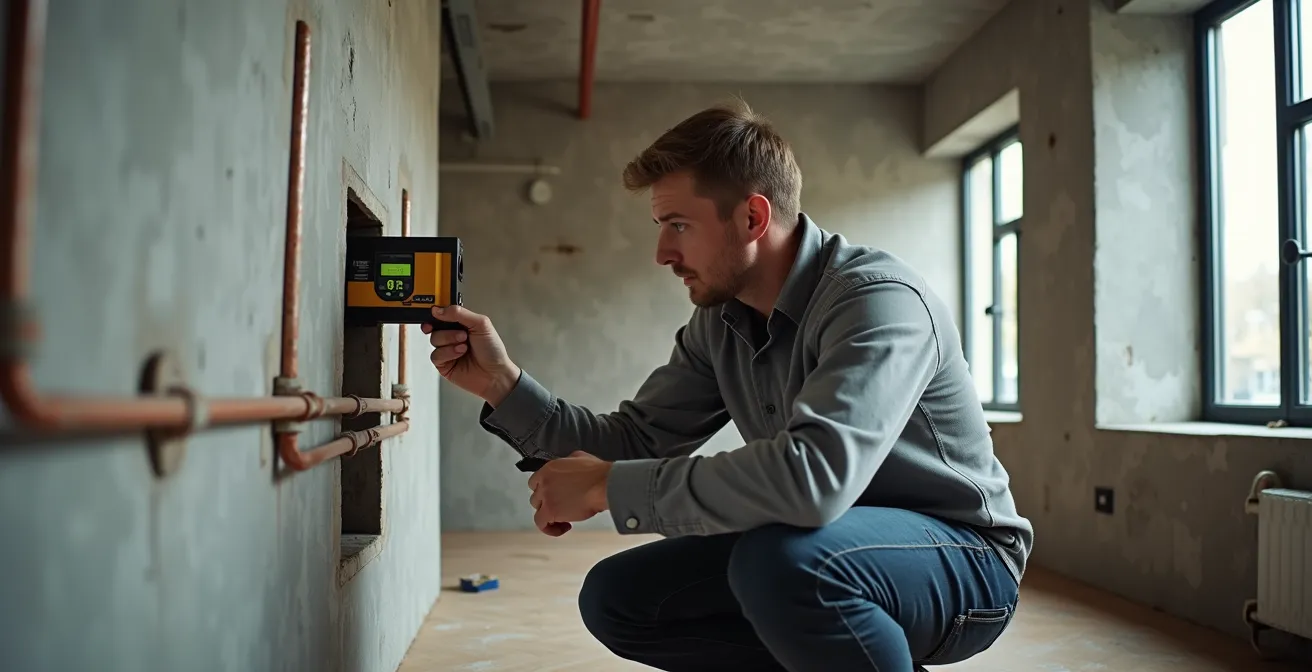
Your creative plumbing solution is framed, the pipes are run, and the waterproofing is complete. At this moment, before a single sheet of drywall or tile goes up, you must make a critical call: to the plumbing inspector. In Montreal, as elsewhere in Canada, all plumbing work must comply with the National Plumbing Code, and a “rough-in inspection” is a mandatory step. Trying to skip this stage is a recipe for disaster. If uninspected work is discovered later, you could be forced to tear down your newly finished walls at a significant cost.
The inspector’s job is to verify several key aspects of your “above-floor system.” They will check that the DWV (Drain-Waste-Vent) pipes have the correct slope. They will verify that any AAVs are installed at the correct height, in an accessible location, and are an approved model. They will inspect the pressure test of your water supply lines to ensure there are no leaks. This inspection is your quality control. It provides a professional third-party validation that your unconventional solution is safe, durable, and up to code. It’s not a hurdle; it’s a safety net that protects your investment.
The importance of this step is highlighted in studies on new plumbing technologies. A pilot study on AAV installations confirmed that inspectors are crucial for verifying correct placement and ensuring the overall venting configuration provides optimal performance while adhering to code, a concept of “code-compliant creativity” that a good contractor masters.
Why Does Flushing the Toilet Scald the Person in the Shower?
This classic and painful plumbing problem, known as “toilet scald,” is a perfect illustration of why your bathroom must be designed as a cohesive system. The phenomenon occurs in homes with older plumbing and, typically, pressure-balance valves. When a toilet is flushed, it demands a large volume of cold water to refill its tank. This causes a sudden drop in cold water pressure throughout the system. The shower valve, sensing this drop, is suddenly fed a much higher proportion of hot water, resulting in a dangerously hot burst of water on the unsuspecting person in the shower.
While a pressure-balance valve is designed to mitigate this by reducing hot water flow, its reaction time may not be instantaneous, and severe pressure drops can overwhelm it. As discussed earlier, a thermostatic valve is the definitive solution to this problem because it’s focused on maintaining a set temperature, not just a pressure ratio. However, the issue also ties back to venting. A poorly vented system can cause pressure fluctuations on the drain side that can indirectly impact the supply side dynamics.
Furthermore, the installation of components like Air Admittance Valves (AAVs) must be done with precision to prevent other issues. As the International Plumbing Code specifies, the valve’s placement is critical for its function and longevity. As one expert from the International Plumbing Code notes:
AAVs must be installed in an accessible location and not sealed behind a wall or ceiling, with the sealing mechanism positioned minimum 4 inches above the horizontal drain.
– International Plumbing Code, IPC Section 918 – Air Admittance Valves Installation Requirements
Ultimately, preventing toilet scald in a new custom bathroom isn’t about one component. It’s about the synergy between properly sized supply lines, a high-quality valve (preferably thermostatic), and a well-designed, correctly vented drain system. This systemic approach is the hallmark of a professional renovation.
How to Group Wet Zones to Minimize Pipe Length and Heat Loss?
Now that we’ve covered the individual components, let’s zoom out to the overall layout strategy. When designing your new bathroom around an above-floor plumbing system, one of the most effective strategies is to group your wet fixtures (toilet, shower, sink) closely together. This “wet zone” or “wet wall” approach offers several major advantages, particularly in a condo renovation.
First, it maximizes hydraulic efficiency. By keeping the horizontal drain pipes from the sink and shower as short as possible before they connect to the macerating pump, you ensure a strong, gravity-fed flow and minimize the risk of blockages. Second, it simplifies construction. Containing all your supply lines and drain pipes within a single, thickened “wet wall” makes the installation cleaner and more manageable. This is the wall that will house your toilet carrier, macerating pump, shower valve, and all the associated piping. Third, it reduces heat loss. Shorter hot water pipes mean less energy is wasted as the water travels from your heater to the fixture, resulting in faster hot water and lower energy bills.
This approach is made incredibly practical by the efficiency of modern macerating systems. Not only do they offer flexible placement, but their installation is remarkably fast. According to Saniflo, with an above-floor macerating installation, an entire bathroom can be made operational in as little as half a day, a fraction of the time required for concrete work. This speed, combined with the design efficiency of grouping wet zones, makes it a powerful strategy for any condo owner.
The specifications of these systems are designed for flexible and discreet installation in residential settings, making them a perfect fit for a condo renovation.
| Specification | Standard Range | Impact on Installation |
|---|---|---|
| Noise Level | 45-60 dB | Comparable to normal conversation |
| Cost Range | $700-$1300 | Significantly less than concrete cutting |
| Vertical Pumping | 15-36 feet | Suitable for basement or condo use |
| Horizontal Distance | 150-328 feet | Flexible placement from main stack |
| Power Requirement | 600-750W | Standard 110V outlet needed |
Key Takeaways
- An “above-floor” plumbing strategy using a macerating system is the most effective way to move a toilet on a concrete slab without raising the floor.
- Success relies on a systems-based approach: integrating the pump, venting (AAVs), waterproofing, and fixture layout into a single, cohesive plan.
- Adherence to the National Plumbing Code and passing a rough-in inspection are mandatory steps that protect your investment and ensure safety.
How to Design a Plumbing System for a Custom Luxury Home?
While our focus has been on a specific condo problem, the underlying principle—designing the plumbing as an integrated system—applies to any high-end residential project. In a custom home or a luxury renovation, you’re not just installing fixtures; you’re engineering a system for comfort, efficiency, and longevity. The “above-floor” strategy we’ve detailed is a perfect example of this philosophy in action. It prioritizes a seamless aesthetic by hiding the mechanics, ensures hydraulic performance through proper venting and layout, and guarantees durability with robust waterproofing.
This mindset means every choice is interconnected. The decision to use a wall-hung toilet leads to the design of a wet wall, which dictates the waterproofing method. The desire for a high-performance shower in an old building leads to the selection of a thermostatic valve, which in turn relies on stable system pressure. A macerating pump is not just a “problem-solver toilet”; it is an enabler for an entire bathroom group, capable of handling all the fixtures in the room.
As the technical documentation for these systems confirms, their capability extends far beyond a single toilet. According to Saniflo’s technical experts:
Macerating systems can handle all fixtures in a bathroom, including sink, tub-shower and toilet, even on septic systems, and can be installed 15 ft below the sewer line.
– Saniflo Technical Documentation, Macerating Pump System Installation Guide
By embracing this systemic approach, you move beyond simply finding workarounds for structural limitations. You begin to design with true freedom, confident that the underlying mechanics have been engineered to support your aesthetic vision flawlessly. This is the ultimate goal of any luxury renovation: to make the complex inner workings disappear, leaving only beautiful, effortless function.
Now that you have the playbook, the next step is to partner with a knowledgeable renovation contractor who understands the nuances of above-floor plumbing systems and the specific requirements of the Quebec building code. An initial consultation will allow you to assess the feasibility of your project and start turning your design vision into a concrete plan.
Frequently Asked Questions about How to Move a Toilet Location in a Condo
Can a macerating toilet handle a full bathroom’s drainage in a condo?
Yes, modern macerating pumps like the 600W models have three additional water inlets, allowing connection to shower, sink, bathtub, or washing machine to meet half-bath, 3/4 bath, or full-bath needs.
How long do macerating toilet systems last?
With proper maintenance, upflush toilets can last 10-15 years. Regular cleaning with mild cleaners and avoiding foreign objects ensures smooth operation.
Does installing a macerating toilet increase property value?
Studies show macerating toilets can increase property value by up to 20%, especially when adding a bathroom where traditional plumbing isn’t feasible.